Parametric Study Using Dynamo
Case Study:
Absolute Towers in Toronto
In this phase of the project, Modeling this building in Dynamo is upon the previously created model in Revit. However, there were some confronted challenges in the previous phase(project 01) and I tried to solve them via Dynamo. The design intent is advanced to generate balconies, control the number of floors and change the curtain panel's color by changing the time. Therefore, this phase- digitally regenerating Absolute Towers- is divided into the below sections :
1- Instantiating Revit mass and parameters to Dynamo
2- Devide Model faces
3- Integrate sun node and setting orientation with coloring setting
4- Create Balconies
Instantiating Revit mass and parameters to Dynamo:
First step is to import Revit mass into dynamo and instantiate its parameters and families to Dynamo. The fact is that I want to work on tower's surface, therefore, the goal is to get to surface via element. Parameters are used to change rotation angle of each floor.
The result is four faces: two as base and upper leven and two as side surfaces. I wanted to work on sided surfaces; therefore, I use GetItemIndex to define my selection and join them together.
 |
| picture 02- select side surfaces
The result is tower surface that I will work on it to generate balconies and divide it to have a curtain system .
|
Divide Model surfaces in Dynamo:
There are several ways to divide this surface. I want to match vertical division to number of floors and controll horizontal division. Hence, I use a package in Dynamo to divide the mass which is " LunchBox Quad Grid By Face". Its inputs are surface, and U & V division and the output is points, polygones and faces. I will use point output and faces in coloring the surface in next steps.
 | ||||||
| Picture 03- import LunchBox to divide the surface
Integrate sun node and setting orientation with coloring setting
In this section, the goal is coloring the surfaces. There are different approaches in this case. one of my alternatives was to introduce on gradient picture to Dynao to colorize the surfaces. I, nonetheless, decided to work another alternative which is creating a colored surface based on sun orientation. It has more challange. One of the outputs of LunchBox is Panel Faces that I connected them as input for NormalAtParameter command and then the result connected to Vector.Dot . Here, sun settings are added and then use them as inputs for color.range. Below is screenshot for this process:
|


 |
| Picture 06- Color of Surface in June 1, at 4:00 pm |
 |
| Picture 07- Color of the Surface in June 1, at 2:00 pm |
 | ||||||||
| picture 08- Color of Surfaces in June 1, at 11:00 am
Additionally, the point is that by changing color settings with number slider, we can change the range of color .
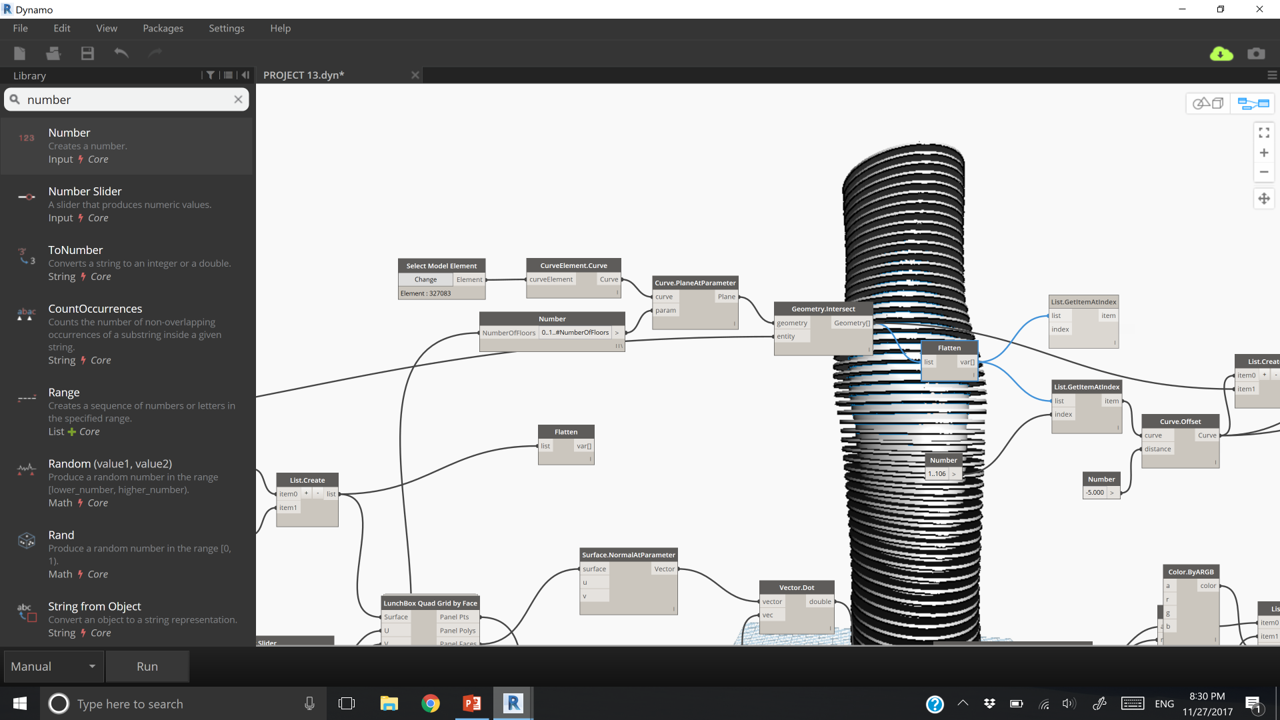
In last section of this project review, I wanted to explain the process of creating balconies around each floors. First step was draw an adaptive line in Revit and instantiate it as an element in Dynamo. I convert it to curve element and cut it with parallel planes with PlanAtParameter command. The output is intersected with surface and the results were curves that needed to be joined. I used Curve.Offset to create the outer side of balconies .
|